I’ve recently started going through the Project Euler problems. It’s an awesome site that basically has a list of math problems that usually need computing power to solve. There are close to 500 problems on there right now, but my OCD means I gotta do them in order! I started working on them a bit and realized I was forgetting why I did things a certain way. Many of their problems can be brute forced, but also have elegant solutions available. I wanted to keep a record of what I was doing so I decided to make a page for it. I’m still working on the site, but it’s almost done. This post is actually not about Project Euler, but about what I learned making the site, especially when I moved from jQuery to AngularJS.
I’ve created a kind of workflow for myself whenever I make any website:
- Create a mockup in HTML/CSS.
- Fill the mockup with some actual content for the main pages.
- Redesign the site’s looks.
- Add any functionality features using JavaScript and JavaScript libraries.
- Tweak! I don’t get too crazy on perfecting it in one go – I’ve found revisiting it after a few weeks helps me look at design more objectively.
- Remember that I completely forgot to make it mobile friendly and redesign… (My goal is to move this step up to #1 – but it never happens)
1. Create a Mockup
This is always hand waving because I know it’ll eventually look radically different from what I first envisioned. In this case, I looked at what I needed: header, left navigation with a grid to select problems, right content area for the main text. Simple enough. I usually make a colorful mockup to make sure I set up all the divs correctly. I like to do it by hand to understand it, but I’d be open to hear what other tools people use. In this case, I came up with something that looks like this:
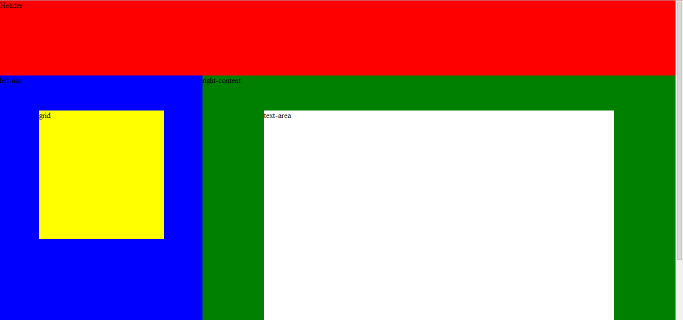
Gorgeous.
2. Fill the Mockup with Content
This is more to make sure I’m not looking over anything obvious, such as titles that are too long or information that needs a separate section. I ensure I can get all the information in the mockup with no big issues.
3. Redesign the Site
In this step, I go hard on the CSS. I usually pick a color scheme (here I went with the same colors as my personal page), font, spacing, etc. Really just trying to make it pleasing to look at. Here’s what I have after this step:
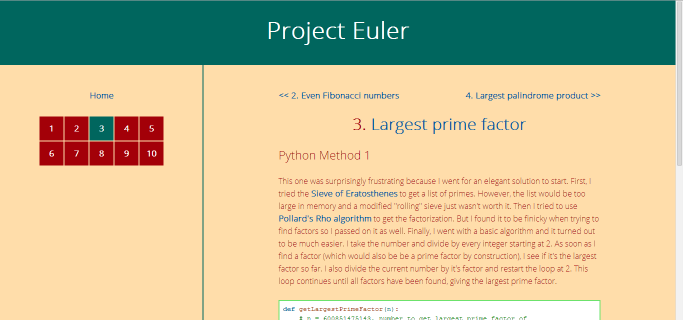
You can still see the similarities in layout, but now it’s not a bunch of bright jarring colors. The left navigation now has a grid of numbers for each Project Euler problem.
4. Functionality
This is the fun step! I created a brief checklist of things I wanted in the site:
- Tooltip on problem hover
- Template with partials for each problem
- Syntax highlighting (the image above already has it included – but that’s actually an external library)
- Charts for runtimes
The tooltip is easy – I used Tipsy. For the syntax highlighting I started with the most popular one: Alex Gorbatchev’s SyntaxHighlighter, but I had to switch later to highlight.js. For charts my answer is always D3. It’s not the easiest to start with, but the customization is amazing. Every time I use it, I have to spend a good chunk of time relearning the basics, but then I’m set to rock!
This leaves the template. I wanted to use jQuery since it’s… well… magical. Fortunately, it has a load() function (basically a GET request) that serves my purpose. Using jQuery is awesome because after designing the page, I can easily go though and manipulate the DOM to create all those pieces above. It’s really easy to follow and understand so I was able to code up the site to do what I wanted in very little time. Of course, there’s a but…
I started to run into issues when I was linking within my app. Let’s take a look at the code to create a link for each problem:
$(document).ready(function() {
	$("#p" + i).click({id: i}, function(e) {
		$("#text-area").load("problems/" + e.data.id + ".html", function() {
			SyntaxHighlighter.highlight();
			$(".selected").removeClass("selected");
			$("#p" + e.data.id).addClass("selected");
		});
	});
});
When the page is ready (and we access the DOM), I add a link to each problem number in the left grid (see image above). In the code above, the “i” is actually a variable being set elsewhere so let’s just assume here that “i” is 3. So for problem 3, the div has id “p3”. When “p3” is clicked, “text-area” is loaded with “problems/3.html” and then we have a “completed” callback function. After the html is loaded, the code runs the SyntaxHighlighter and selects the right item in the grid using the class “selected” (turning it dark green).
Great, that works so what’s the deal? Well, this code has to be done for every link now, instead of the <a href> we normally use. Furthermore, the navigation links I have on top of the content area to go forward or back 1 problem, now needs to be set up this same way on page load. The code is starting to get really messy…
Furthermore, the url isn’t synchronized with the page being loaded. I could never send a direct link to problem 3 such as “www.example.com/problem/3”, instead I could only send a link to the home page. For the same reason, this didn’t create any browser history so you couldn’t go back and forward.
This is when I decided to use AngularJS. I’ve used it before but never got deep into it for 2 main reasons: it’s easy to do magic with it quickly, but getting to the more complicated stuff is exponentially more difficult and, I honestly wasn’t a fan of their docs/tutorials. AngularJS is not made to be an add-on to jQuery. In fact, it’s a completely different style of thinking, so I got rid of (almost) all the code I had. In jQuery, it’s all about manipulating the DOM, while AngularJS is about data binding (synchronizing the model and the view). In Angular, the view is king. When I look at the HTML, I should be able to spot Angular directives that control the functionality.
So let’s revisit the jQuery code above. I no longer need to create a click function. Now, I just use a controller to serve the right files depending on the URL route. So in my controller, I just need one line of code:
$scope.templateUrl = 'pages/' + $routeParams.problemID + '.html'
This essentially takes care of all the routing. Now if I go to http://rajarshidas.com/projects/ProjectEuler/#/problem/3/ – it works!
Cool, what about the callbacks? For the “selected” functionality that highlights the link in dark green for the current page we’re on, we can use built-in directives:
<a ng-href="#/problem/{{col}}" ng-class="{ selected:activeProblem(col) }" ng-attr-title="{{problems[col]}}" tipsy="s">{{col}}</a>
Here col, is the problem number, so let’s say 3. The ng-href is creating a link to “#/problem/3”. The ng-class is essentially setting the class of this <a> tag to be “selected” if it’s tied to problem 3. The tipsy is a custom directive I explain below.
Ok and how about the Syntax highlighting? Well this is where Angular gets a little trickier. Basically, we need to create custom directives that allow us to attach behavior to the element. This needs to be done for each external library. For syntax highlighting, I found this post which used highlight.js. I tried to translate for SyntaxHiglighter but couldn’t get it to work so switched to highlight.js instead.
I had to do the same for the Tipsy, the tooltip library as well.
In the original jQuery:
$("#p" + i).tipsy({gravity: 's', fade: true});
As an AngularJS directive:
myApp.directive('tipsy', function() {
	return {
		restrict: 'A',
		link: function(scope, element, attrs) {
			element.tipsy({
				gravity: attrs.tipsy,
				fade: true
			});
		}
	}
});
And the corresponding view:
<a ng-href="#/problem/{{col}}" ng-class="{ selected:activeProblem(col) }" ng-attr-title="{{problems[col]}}" tipsy="s">{{col}}</a>
Here the tipsy tag creates the Tooltip. Notice how Angular’s style makes it apparent in the view that we have a tooltip compared to jQuery where that is somewhere in the script.
So that’s where I’m at right now. I still have to figure out how to incorporate D3.js with this. I temporarily hacked it to work using jQuery on top of AngularJS. But hope to change that soon!